Graphic 45 A Ladies Diary:
Wall Decor
Wall Decor
Good Evening Crafty Bloggers!! D.L. Mannex here, back with a new project!!
Sometime last year, my very Best Friend Lori, who introduced me to crafting by the way, went to Scrapbook Expo and brought me home the most amazing paper stack. She bought me my first Graphic 45 paper stack, A Ladies Diary. I instantly fell in love with it, but because of its very many options, I didnt have the courage to use it. So I tucked it away.
Just the other night, after I finished my previous Blog Post, I went browsing through Pinterest. While rummaging through the "DIY and Crafts" search, I came across the most beautiful Panel Wall Decor, which can be seen HERE. That very Pin drove me to dig out that beautiful paper and start brainstorming ideas. After all, the original Blogger didnt post how she made it.
Then I had an amazing idea, remembering that I had collected some ChipBoard like Coasters from a bar on my honeymoon. Not knowing at the time what I could create with them, but I am sure glad I grabbed them! Well enough chatter, here is my Wall Decor!!
Now I even surprised myself with this creation. Ive never done anything this amazing in crafting. But I can give you a run down of how I did this if you have a few more minutes to spare.
Supplies:
- 4 Chipboard-like Coasters
- Gesso
-Tissue Paper
- Metallic Folk Art Paint
- G45 A Ladies Diary 12 x 12 stack
- Assorted Embellishments
- Gold Chain
- Foam Mounting Tape
- Assorted Adhesives
- Assorted Paper Trimmers/Scissors
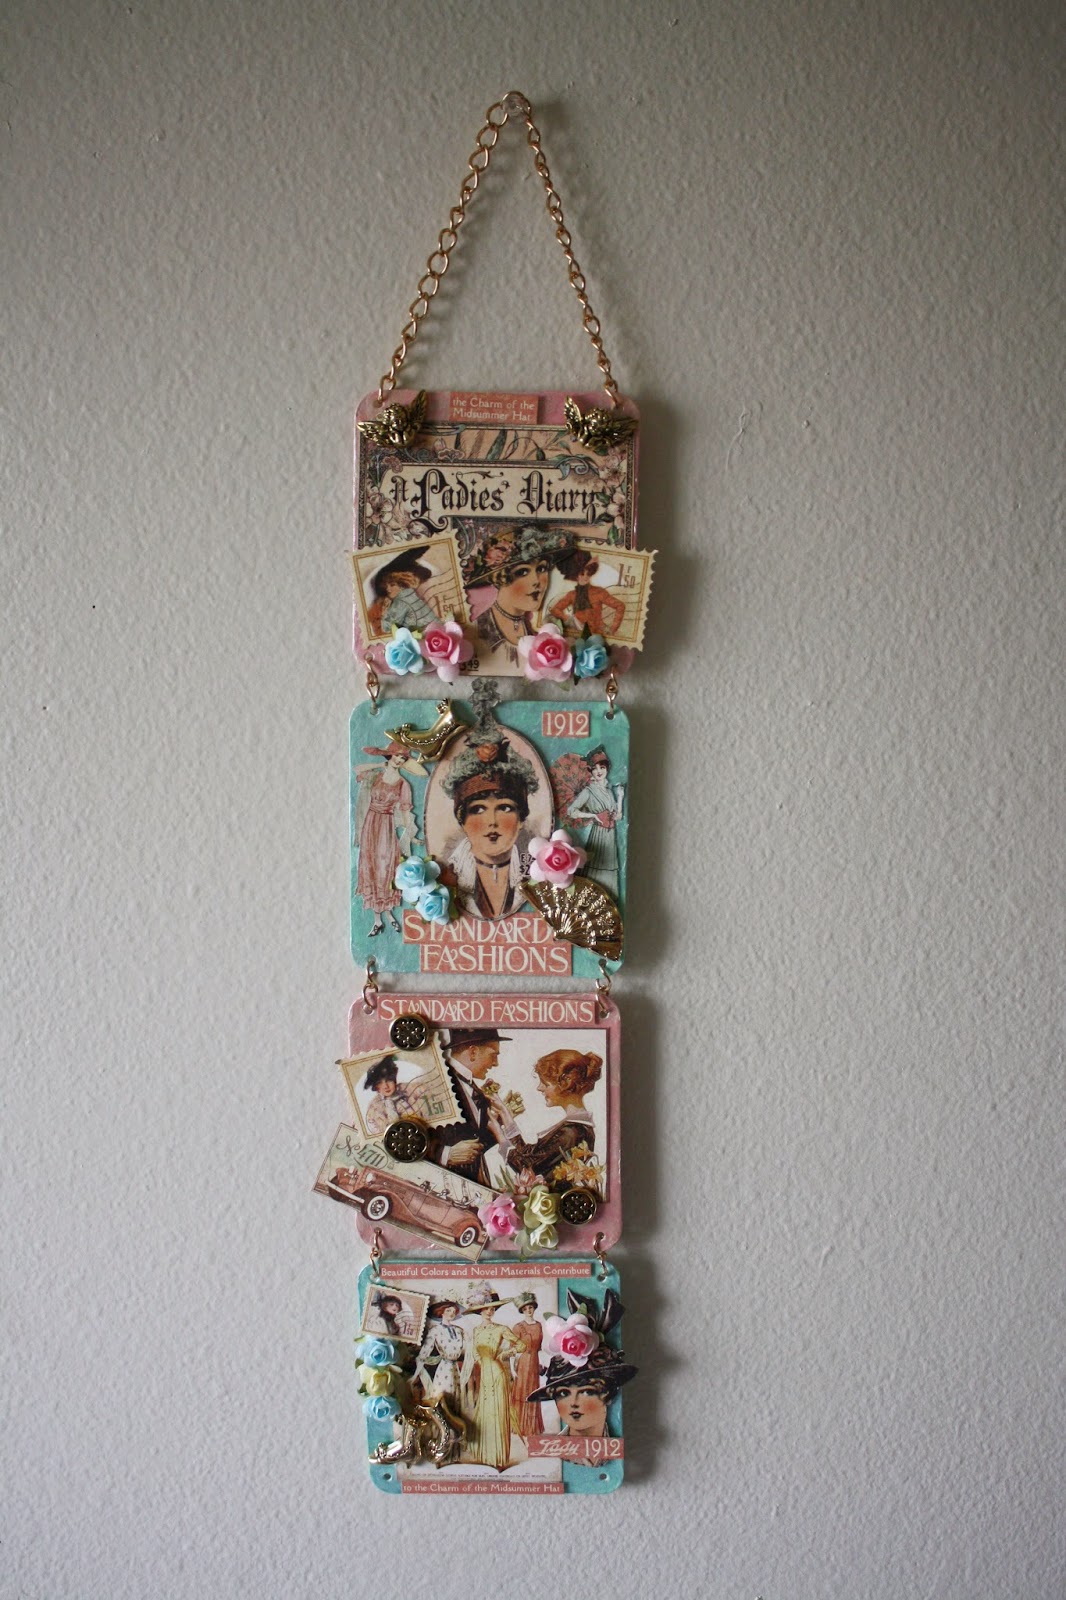
Now, these Coasters started out with Coors Light Advertisements on them. We could'nt have that showing through so, I experimented with Gesso for the first time. For me it only took one solid coat to cover the advertisement. I let them dry for a couple hours and when I returned I noticed that the Gesso had added a little more texture to the surface. But that wasnt enough for me, so I whipped out the Mod Podge and started laying down layers of tissue paper. For the two Pink Panels, I used Pink Tissue Paper and the two Aqua Panels I used a light Pastel Green Tissue Paper.
When I got the texture I wanted, I again let them dry for a couple hours. Then the Metallic Folk Art Paint came in. On the Pink Panels, I lightly coated over it with Champagne (#2484), and on the Aqua Panels, a light coat of Metallic Ice Blue (#2588).
Now from this point on it would be your preference of how to arrange things. For each Panel I decided on a focal point. For the first Panel, the focal point is basically the title of the project.
I then just built around it with images from the 12 x 12 stack, little charms and paper flowers.
For Panel two, the Focal was the lovely framed Lady in a very Fancy Hat. She is lifted with Foam Mounting tape, while the other two full bodied ladies are flat to the surface. And again, small charms and paper flowers.
For the Third Panel, the Lady pinning Flowers to Gentleman's lapel is the focal point. This image is flat to the surface, where as the Lady Stamp and Vintage Car images are lifted with Foam Mounting Tape. Here I was able to chang up the paper flower colors because the focal image had yellow flowers in the lower right hand corner.
In the final Panel, I did my best to combine all of the colors and levels of the previous three panels. Here the Focal is the Lady in the Yellow Dress, center image, which is flat to the surface. All other images are lifted with Foam Mounting Tape.
I then let everything rest over night, and added the gold chain to link them all together, and so that it could hang on the wall.
Overall this was a very thrilling project, I tested my limits far more then I have ever imagined. Using things I never thought i'd touch and making up new techniques to further my abilities.
Thanks again for taking the time to enjoy this post, and please come back soon to share in my adventures!
And with that, Divine Designs Out!!
No comments:
Post a Comment