Monday, May 18, 2015

Three for One

Three for One

Hello everyone!! I apologize for the super late post, so today is a Three for One video post.

First off we have last week's "Half-Way Wednesday" Greeting Card Tutorial, which was a mermaid themed card. Funny thing was, after this was filmed I was browzing my local Dollar Tree Store and found some stickers that would have made this project much nicer, so I may be doing this project again or something Beach themed very soon. Below you will find a picture of the finished project and the attached tutorial video.


The next video was my first "Freaky Friday Vlog" were I explain some things about myself, my art, and my crafting. You can thank my Best Friend Linda for the idea.


And finally, our second "Monday Madness: Craft Tutorial" which was filmed and posted this morning features a Patriotic themed Picture Frame, in honor of the upcoming holiday of Memorial Day! Below you will find an image fallowed by the video tutorial!


Just want to send out a big thanks to all my supporters!
Keep an eye out, Half-Way Wednesday isnt to far off, I will be showing off how to make a Patriotic themed greeting card to go with that Patriotic Picture Frame!

With that,
D.L. Mannex out!

Monday, May 11, 2015

Monday Madness : Altered Notebook

Monday Madness: Altered Notebook

Hello everyone, D.L. Mannex here with a new craft to share! 

In the last Blog Post, I mentioned that because of my new equipment, I was able to make a schedule for making tutorials and posting on all of my websites. Well, here I am!

You can tell from the title of this Blog Post what day it is and a peek of what I will be showing you today. So I will start off by making a list of the things you will need for what I consider a simple craft.

~Small Notebook 
(mine was purchased at my local Dollar Tree)
~One Sheet of 12x12 Scrapbook Paper
~Glue Stick
~Hot Glue Gun
~Lace and/or Ribbon
~Random Matching Embellishments

Below you will find a picture of my finished project and just below that I have posted the Youtube Video Tutorial I filmed of the creating process.


Hope you all enjoy the video. Please feel free to subscribe to my Youtube Channel for all my upcoming videos. I also plan to have hauls and  give-aways so stay tuned!

Love you all and Thank You all for your support!

~D.L. Mannex

Wednesday, May 6, 2015

New Equipment Is Here!

New Equipment Is Here!

Hello there everyone!! D.L. Mannex here with some epic news! I have finally been able to purchase all the equipment necessary to start my new Youtube Channel. The previous one was causing a hassle due to my name not matching the email address so I decided to make a new email and attach a new Youtube Channel. I also invested in a new webcam, a Logitech 920C 1080p HD. I also invested in a semi decent microphone and a 1TB external hard drive to store all my Artwork and Crafts, and the videos I post to my new channel. Below you find the links to all of my websites, some of which are new and some are the same as before.

DeviantArt: HERE
Facebook:HERE
YouTube:AND HERE

I would also like to announce that I have made a schedule in which I hope to stick to starting next week. I have decided that all of my pages will display all of my work, including Original Works of Art and Fan Art, and my Crafts. No sence in making seperate accounts for my many different hobbies. So here is the schedule I have arranged and hope to stick to starting Monday, May 11th 2015.

Weekly Goals:
Monday: "Monday Madness:Craft Tutorial"
Wednesday: "Half-Way Wednesday:Card Tutorial"
Friday: "My Freaky Friday Vlog"

Monthly Goals:
* 2 or more Drawing/Coloring Tutorial Videos: at least 2 full drawing projects displaying my use of materials and my personal tips and tricks.
* 1 Thrifty Thursday Project: at least one thrifty project in which an item purchased at my local Thrift Stores is Altered and/or Repurposed.

General Goals:
* Provide Product Reviews
*Share Haul Videos
*Answer Questions and/or Comments from Viewers
*Supply Future Giveaways

In the end I have three simple yet not so simple goals. I wish to build a steady Fan Base that I can communicate with. To Promote not only myself, but other Artists and Crafters. And maybe someday, Pursue and Bright Financial Future with my Artwork and Crafts.

I wanted to Thank You All for youre continued support! It means alot to me, and I love you all!

-D.L. Mannex

Monday, February 2, 2015

DCWV French Country Wall Decor

DCWV French Country Wall Decor

With a few Craft Fairs on the horizon, I have had to broaden my ideas to create new things, maybe even some things I have never thought of doing. I have only done Wall Decor once before and that was out of coasters from a Bar. This time I was digging through some donated supplies and came across three wooden Heart Shapes.


To give you a little information on what I did, from this point I gave each wooden shape a good layer of Gesso. I then dug out my DCWV French Country 12x12 stack and using ModPodge I adhere the paper to what would the front side of each heart. 

Some of the other things I used include; Lace and Ribbon, Pearl Beaded Trim, Paper Roses from a shopping trip in L.A., Prima Flowers, Flatback "Candy" Jems, and Glossy Accents. The result is as follows.

3 Tier Heart Decor

Heart 1 Close-Up


Heart 2 Close-Up


Heart 3 Close-Up


I was aiming for Shabby Chic but I think I may have strayed some. But I think it would perfect in a little baby girls Nursery or young girls Bedroom. I am not sure what my asking price will be yet but I have time to think it over.

Comments and Critism is welcome below in the comments section.

With Much Love,
D.L. Mannex


Saturday, January 31, 2015

News From the Front!

News From the Front!


Well actually its news from The Desert Trail, which is my local Newspaper! I am so excited that because I entered a peice into a local Art Show, I was also selected to be showcased in the The Desert Trail! Nothing like this has happened to me before so I am so very excited and intensely grateful! Below you will find two photos of the clipping!

As you can see, my artwork is displayed over my left shoulder. 


I would also like to mention that the gentleman on the left, his name is Russell Richeal II and he had 2 pieces displayed that day as well. He is very skilled in larger cross stitch pieces, painting ceramics, and crafting jewelry and paracord accessories. I will leave a link to his Facebook Art Page (here)

I have to say, because of the amazing time I had the day of the Art Show, learning more about this town and its neighbors, I have gained a little more confidence in my art work and it has pushed me forward. I have started a secret stash fund so I can persue opening my own business for my crafts and art works. I plan to start small, local vendor craft fairs, then branch out to online using Etsy and similar sites, then someday maybe owning my own Store Front. It all seems a little far away but the first step is to do something, so I did the research and I started saving to do it.

Well I believe that's it for this Entry. Hope everyone has a fantastic day! D.L. Mannex out!


Friday, January 16, 2015

Valentines Frenzy Begins!

Valentines Frenzy Begins!

Good evening everyone! D.L. Mannex back for a second night of Blogging! I have fired up Pandora Radio and I am excited to announce my Valentines Frenzy has begun! I know the Holiday of Love is still a month away but I thought I would be the perfect time to get the crafting juices flowing. What better way then to start by making some Valentines Day Cards? Well besides baking the goodies but I cant do that yet.

So today, besides running out of the room to get the pile of Laundry under control, I had time to get comfy and make two Valentines. I know that doesnt sound like alot, but if you would have seen the pile of Laundry, you'd be amazed that I was able to make two. And I still managed to dig out my DSLR and take some decent pictures to put up.

Below you will find Valentine #1. Now, for not making cards in several months, five months in fact, I was amazed that my brain put this on together. 
I pulled out a few pieces of scrap cardstock and an Ivory Card. Now, for the Sentiment, this was a first. It was a rub-on, which I have never done by the way. But as you can see, it went well. I then distressed the edges of the card with a Pastel Pink Ink. From there I hot glued the ribbon trim, followed by the pearl trim. Placing the two pink ribbon roses and floral button came next. The sentiment was then adhered to the heart shaped dollie, then the dollie adhered to the red cardstock. The final touch was the two heart stamps in the upper right corner and lower left corner. And of coarse on the back it is stamped with "Uniquely Handmade Limited Edition" along with my signature and the URL to this Blog!

As for the second card, for once in my life, I got more creative as the day went by. Firstly I was playing around with a pack of Recollections Paper Flowers, hence the beauty lower center on this card.I also had the beaded stamins which just added to the epicness. Again I started with an Ivory Card but this time I adhered a themed piece of cardstock to the front. I then hot glued the three seperate ribbons, burning my finger in the process. Oops! I then dug out the cute little pink and white cameo upper center and hot glued her down. The Sentiment was stamped on pink card stock, then the pink pearl frame was placed around. I cut around the frame and adhered it to another heart dollie. The dollie was then adhered to the center pink and white dotted ribbon. Lastly I hot glued that epic paper flower to the bottom of the dollie. And yet again, on the back it is stamped with "Uniquely Handmade Limited Edition" along with my signature and the URL to this Blog!

I would appreciate any and all feedback on these two cards, in fact I always look foward to it.

Now I here my husband watching one of my favorite TV shows! Off I go!

Sweetest Dreams,
D.L. Mannex

Thursday, January 15, 2015

Finally Back In Action!

Finally Back In Action!

Hello all of my loyal fans and fallowers, D.L. Mannex here! I am officially back! 

My husband and I are finally settled into our new home in our new town!

 I have unpacked about 75% of my Art/Craft Room, so I am pushing around some new creative energy! I am happy to report that all of my tables are set up, all me equipment is plugged in and ready to go!

I also discovered, while exploring my new city, a small Arts and Crafts Supply store! Sadly the closest Micheals, Joanns, and/or Hobby Lobby is more then 45 minutes away from my new location. So this little store and online retailers are going to be my new best friends. 
But this little store is the cutest thing and they are having their 3rd Anniversary Art Show coming up next Saturday (Jan 24th)! After talking with the owner and with some encouragement from the Husband and my other Friends and Family, I have decided to enter a piece! Which I dropped off today I am happy to say! And not only will it be featured in the show, it will also be for sale! The shop will be making 20% Commission on in, which I have no objection with because I am happily earning the other 80% if it sells! I have never tried anything like this before, but being in this new place and with art being so well recieved out here, I thought "Why not put my foot in the door?"


And there she is!

The title of the piece is "Spirit in Lights". She is an 11" x 17" beauty done with; Copic Markers, PrismaColor Pencils and Faber-Castall Polychromos, and Koi WaterColors. Oh and just a touch on White GellyRoll Gel Pen for highlights and my signature at the bottom. From Sketch to Finish, she took me about 21 hours total to complete. Oh and she is priced at $125.00 for the Art Show.

I am very excited to be part of the show and am happy to have busted out a new drawing! BUT!! I look forward to getting into crafting again very shortly. Unfortunately, until now, I have been forced to neglect my Blog, my YouTube, and my Artist FaceBook page. Now I have no reason to push out drawings and craft projects like a pro, and to film and post more tutorials on YouTube to help those interested in my type of hobbies and works!

So with all of that off my chest, I am going to go for a quick stroll with my husband, then race back to my new craft room to get creating! I want to thank you all for sticking with me and for your continued support!! Please feel free to leave comments or ask questions below! 

With love,
D.L. Mannex

Monday, November 24, 2014

"FLOOD the streets with ART" Contribution

"FLOOD the streets with Art"
Contribution

Hello everyone!! D.L. Mannex here! Long Time No Blog! I am so sorry for not being around very often but as many of you know, my Husband recently came back from being deployed for over 7 months and we are currently in the process of being restationed. I currently dont have access to any of my crafting supplies because they are all in storage until we can settle into our new home in late Jan. However, I was able to keep some of my drawing/art supplies in my hands and have been busy with my doodles and even started a series of 12 pieces for a 2016 Calendar! You can all Thank my Husband for that one!

But to get to the topic of this Blog Entry, I recently was invited to an Event on Facebook titled "FLOOD the streets with ART(Part II)" which also was a group under the same title. You can find the link to the Group HERE .

In short, it is an event that an Artist makes a piece or Art that they are willing to give away, made specifically to give away. Then on Friday November 28th, 2014, yes Black Friday, they simply drop it off in a high human traffic area, such as a store or in my case a coffee shop, in the hopes someone will pick it up and take it home. Also you make a Tag to go on it, so people passing by realize that it is free to take home.

Below you will find a picture of the piece I will be dropping!


Above is the piece I did specifically for this event. It took me 4 days from Sketch to Transfer to Finish in full Color. And I mean 4 Days, at least 12 hours a day. I used several types of supplies. The final is on 11 x 14 Smooth Bristol Paper. The beautiful Lady is done with Copic Marker, Faber-Castell PolyChromos, Gel Pen, and Sakura Pigma Micron Multi-Liners. The Background is done in cheap Watercolor Paints.

This was my first attempt with using all of these things in one piece, and my first time using Watercolors all together. I also went to my local Dollar Tree Store and bought Red Sale Tags for the Tag Option. Under Sale I wrote " FREE!!!! I'M YOURS!!!!" and on the reverse side I explained why it was free and left my contact information and a link to the Event page on Facebook, which can be found above.

For those who might want to know, I will be dropping this outside a coffee shop in my hometown of Apple Valley, Ca. I have yet to decide which coffee shop and most likely wont decide until that morning. I want it to be a spur of the moment choice, just as it will be a spur of the moment choice for who will pick it up.

I want to Thank Everyone who is taking the time to read this, and for all those who have continued in their support of me and my crazy ways of expression.

I would also like to extend my Prayers and Wishes for Everyone to have a Wonderful Thanksgiving,and a Safe Black Friday. And if I am forced to neglect my Blog for a long amount of time again, I want to extend my Prayers and Wishes for everyone to have a Safe and Very Merry Christmas!

D.L. Mannex Out!

Wednesday, August 20, 2014

Prize Mail from Sonya Winston!!

Prize Mail from Sonya Winston!

Hello Everyone! About 3 weeks ago a Crafter named Sonya Winston announced a Giveaway on her YouTube Channel. I had been a subscriber of hers since her first video was posted, so I decided to enter for the prize. A week later she posted a video to announce the Giveaway Winner, and to my shock, it was me. I was extremely excited not only for the prize, but it was also my first giveaway win!

Below you will find my video, showing off Sonya's generous giveaway prizes and a beautiful hand crafted card! And then below that you will find two links. One to her YouTube Channel, and another to her Blog! Please show her some support, she has been incredible generous!


Thank you so much everyone! Till Next Time!

~D.L. Mannex : Devon's Divine Designs~

Tuesday, August 19, 2014

First Tutorial Video!

First Tutorial Video!

Hello and Good Evening Crafty Bloggers and Friends! I am happy to announce that I have posted my first crafting tutorial to my recently created YouTube Channel. I am so excited, I have already recieved 6 Subscribers and a few nice comments and emails. I look forward to many videos in the future and hope you will take some time to stop by and take a look.


Anniversary Card

My Parents will be celebrating their 31st Wedding Anniversary on 8/20/14! I am so happy for them, and went ahead and made a simple yet elegant card for them!


Below you will find the Video Tutorial I posted on my YouTube Channel. Please feel free to leave comments and/or questions either here or in the comments section on Youtube. I am so excited to share this with you and would appreciate a thumbs up on the video! 


Thank you so very much for visiting my blog! Have a fantastic evening!

~D.L. Mannex : Devon's Divine Designs~

Sunday, August 17, 2014

My Intro to YouTube!

My Intro to YouTube!

Good Sunday Afternoon to Everyone! I know it has been a while since I have posted but I am back and I have plenty of things planned in the future!! 
Below you will find the link to my YouTube Channel and my first video. It explains a little bit about me and what I believe I can contribute to everyone in the Crafty Community.


Thank you for your time, and I hope you will share this with your friends as soon as I get my first craft video uploaded!

Thursday, April 10, 2014

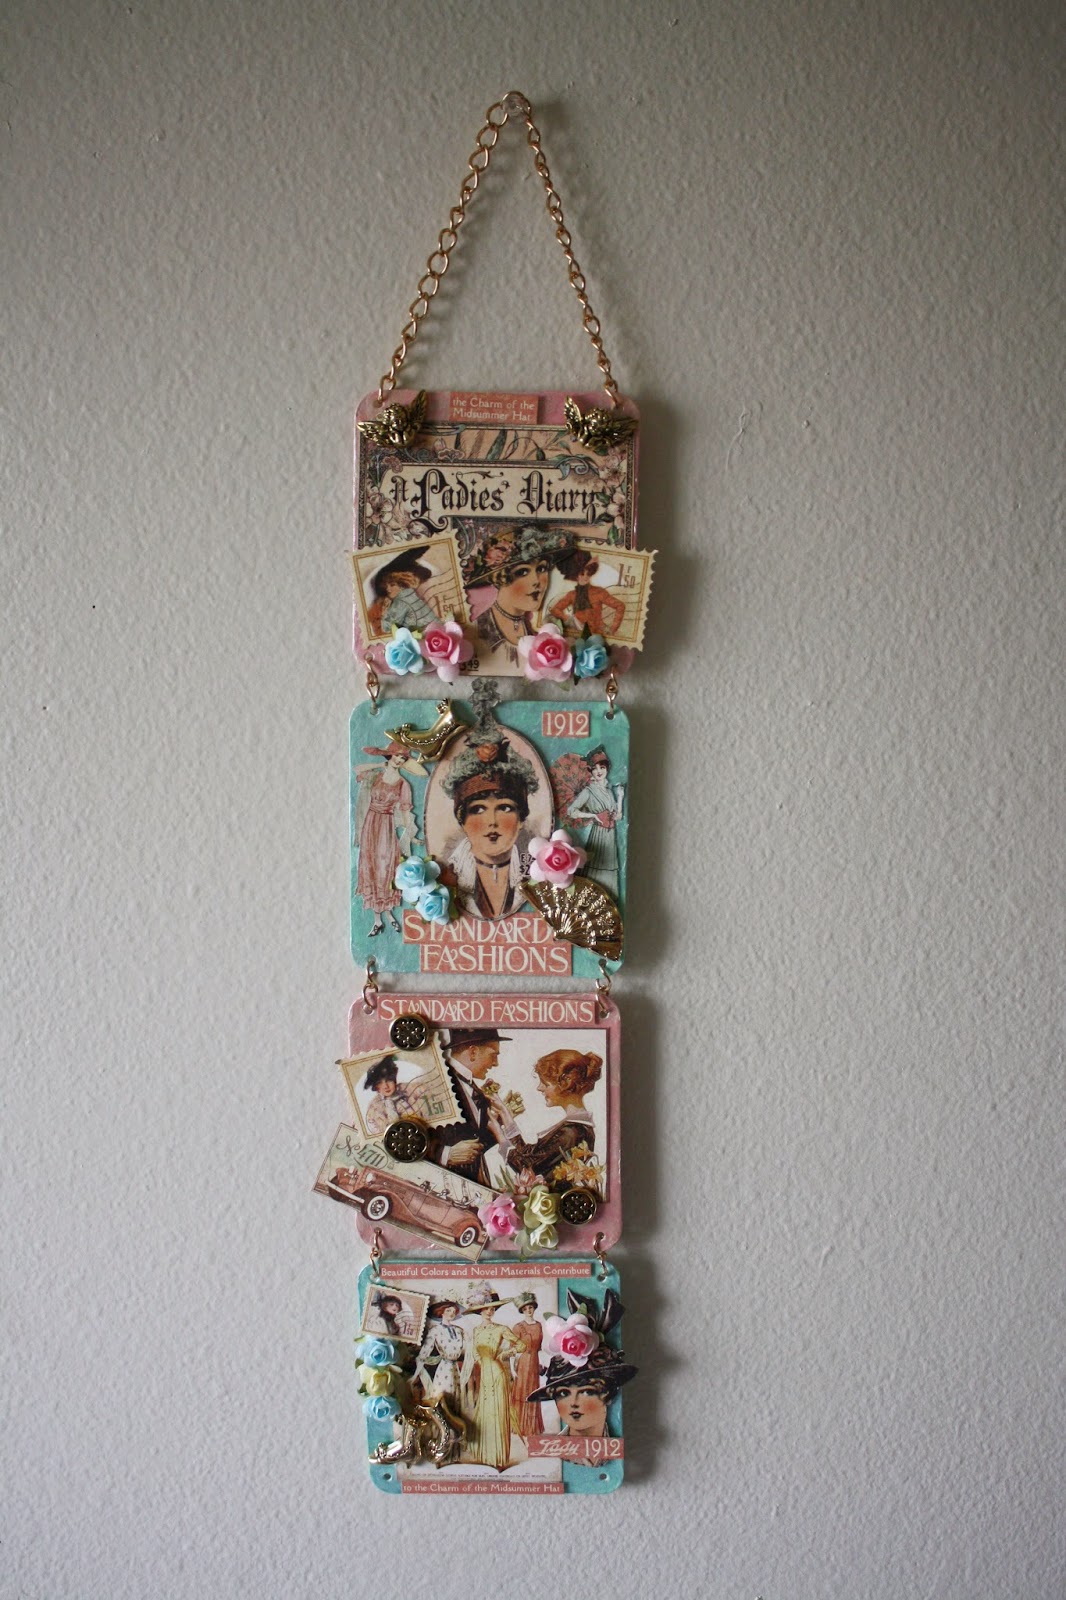
G45 A Ladies Diary : Wall Decor

Graphic 45 A Ladies Diary:
Wall Decor


Good Evening Crafty Bloggers!! D.L. Mannex here, back with a new project!!

Sometime last year, my very Best Friend Lori, who introduced me to crafting by the way, went to Scrapbook Expo and brought me home the most amazing paper stack. She bought me my first Graphic 45 paper stack, A Ladies Diary. I instantly fell in love with it, but because of its very many options, I didnt have the courage to use it. So I tucked it away.

Just the other night, after I finished my previous Blog Post, I went browsing through Pinterest. While rummaging through the "DIY and Crafts" search, I came across the most beautiful Panel Wall Decor, which can be seen HERE. That very Pin drove me to dig out that beautiful paper and start brainstorming ideas. After all, the original Blogger didnt post how she made it.

Then I had an amazing idea, remembering that I had collected some ChipBoard like Coasters from a bar on my honeymoon. Not knowing at the time what I could create with them, but I am sure glad I grabbed them! Well enough chatter, here is my Wall Decor!!


Now I even surprised myself with this creation. Ive never done anything this amazing in crafting. But I can give you a run down of how I did this if you have a few more minutes to spare.

Supplies:
- 4 Chipboard-like Coasters
- Gesso
-Tissue Paper
- Metallic Folk Art Paint
- G45 A Ladies Diary 12 x 12 stack
- Assorted Embellishments
- Gold Chain
- Foam Mounting Tape
- Assorted Adhesives
- Assorted Paper Trimmers/Scissors

Now, these Coasters started out with Coors Light Advertisements on them. We could'nt have that showing through so, I experimented with Gesso for the first time. For me it only took one solid coat to cover the advertisement. I let them dry for a couple hours and when I returned I noticed that the Gesso had added a little more texture to the surface. But that wasnt enough for me, so I whipped out the Mod Podge and started laying down layers of tissue paper. For the two Pink Panels, I used Pink Tissue Paper and the two Aqua Panels I used a light Pastel Green Tissue Paper.

When I got the texture I wanted, I again let them dry for a couple hours. Then the Metallic Folk Art Paint came in. On the Pink Panels, I lightly coated over it with Champagne (#2484), and on the Aqua Panels, a light coat of Metallic Ice Blue (#2588).

Now from this point on it would be your preference of how to arrange things. For each Panel I decided on a focal point. For the first Panel, the focal point is basically the title of the project.


I then just built around it with images from the 12 x 12 stack, little charms and paper flowers.


For Panel two, the Focal was the lovely framed Lady in a very Fancy Hat. She is lifted with Foam Mounting tape, while the other two full bodied ladies are flat to the surface. And again, small charms and paper flowers.


For the Third Panel, the Lady pinning Flowers to Gentleman's lapel is the focal point. This image is flat to the surface, where as the Lady Stamp and Vintage Car images are lifted with Foam Mounting Tape. Here I was able to chang up the paper flower colors because the focal image had yellow flowers in the lower right hand corner.


In the final Panel, I did my best to combine all of the colors and levels of the previous three panels. Here the Focal is the Lady in the Yellow Dress, center image, which is flat to the surface. All other images are lifted with Foam Mounting Tape.

I then let everything rest over night, and added the gold chain to link them all together, and so that it could hang on the wall.

Overall this was a very thrilling project, I tested my limits far more then I have ever imagined. Using things I never thought i'd touch and making up new techniques to further my abilities.

Thanks again for taking the time to enjoy this post, and please come back soon to share in my adventures!

And with that, Divine Designs Out!!


Monday, April 7, 2014

April 2014 Challenge : Tonya Gibbs Sketch

April 2014 Challenge: Tonya Gibbs Sketch

Good Evening Bloggers! D.L. Mannex with Devon's Divine Designs here!! Announcing my very first Challenge Entry in my crafting Career, and I am so very excited! If youd like to take on this Challenge, go HERE !

It all starts with this beautiful sketch from Tonya Gibbs!


The Challenge is to use Washi Tape, Scraps, or Old Products. Sadly I dont own any Washi Tapes, but Old Products and Scraps are my best friends in the crafting world, often coming to me as hand-me-downs, yard sale finds, or clearancing items at craft stores or expos. So before I get started here is a Supply List for my version of this wonderful sketch.

Supplies:
~ Card Base : Ivory - Recollections
~ Mixed Pattern Cardstock (Yard Sale Discovery)
~ Paper Doily (Hand-me-Down Supplies)
~Memento Ink : Rose Bud
~Color Box Cat's Eye Inks : Pastels
~Tattered Angel Glimmer Mist: #16850 Valentine Pink
~ "Thank You" Cling Stamp
~Spotted Feathers
~Rinestones
~Silk Ribbon Rose
~ Assorted Trimmers and Adhesives


And now, here is my version of the Sketch!!

So after digging out the scraps of Mixed Pattern Paper, I took my Westcott Paper Trimmer and eye-balled trimming them down in different sizes to match the Sketch the best I could.
Then using my Tape Runner, I adhered the trimmings to the Ivory Card Base.
Next was the Paper Doily, which I sprayed with Tattered Angel Glimmer Mist in Valentine Pink (#16850). To speed up the drying process, I used my Martha Stewart Heat Gun. Which I then Adhered over the trimmings with my Tape Runner.


Then I came across two tags in the same patterned papers ad the trimmings. I distressed them with Color Box Cat's Eye Ink in Pink Pastel, and stamped "Thank You" in Memento Ink in Rose Bud.
Using Foam Mounting Tape, I adhered the two tags together, giving the top on some lift. Then using my Hot Glue Gun, I glued the Spotted Feather between the two tags, and the Silk Ribbon Rose on the top tag.
Once again, using Foam Mounting Tape, I adhered the Tags to the Doily, giving it some lift.


Last but not least, I used my Hot Glue Gun to glue down the Rinestones in the Triangle Pattern displayed in the Sketch.


Over all I am very impressed with how much fun I had doing this. Ive never been much of a card maker but apparently all it takes is a beautiful sketch and some scraps. 

Thank you Tonya Gibbs for the Challenge!

And again, whoever finds inspiration in my creation and would like to take on this Challenge, just go HERE !!

And with that, Divine Designs Out!!


Wednesday, February 26, 2014

And So It Begins

And So It Begins

I finally begin the first 3 of 5 Wedding Albums for my family. After purchasing the Chipboard Albums from Micheals and digging through my paper packs. A few hours and a ton of Mod Podge later I managed to cover the all the albums with Paper.

Then yestarday I finally found the time to get the photos printed for the albums. They came out perfect, sizes from 5x5, 4x6, and 5x7. I also went all out and got myself a new self healing mat, 4 new pairs of scissors in various sizes, double sided tape, foam matting tape, and clear sleeves.  Now I believe I am ready to start filling the albums with amazing pictures and embellishments

Today marked another milestone for myself. I began Apartment Hunting today. And I have an appointment next week to view at least 2 but possibly 4. I will soon have a 2 bedroom apartment, 1 room will be an art studio. I am so excited for this!

But the bad news is, my Husband is set to deploy soon. Time is ticking faster then it ever has before. But I have told myself that I will get through this.

Sunday, February 9, 2014

New Name, New Life!

New Name, New Life


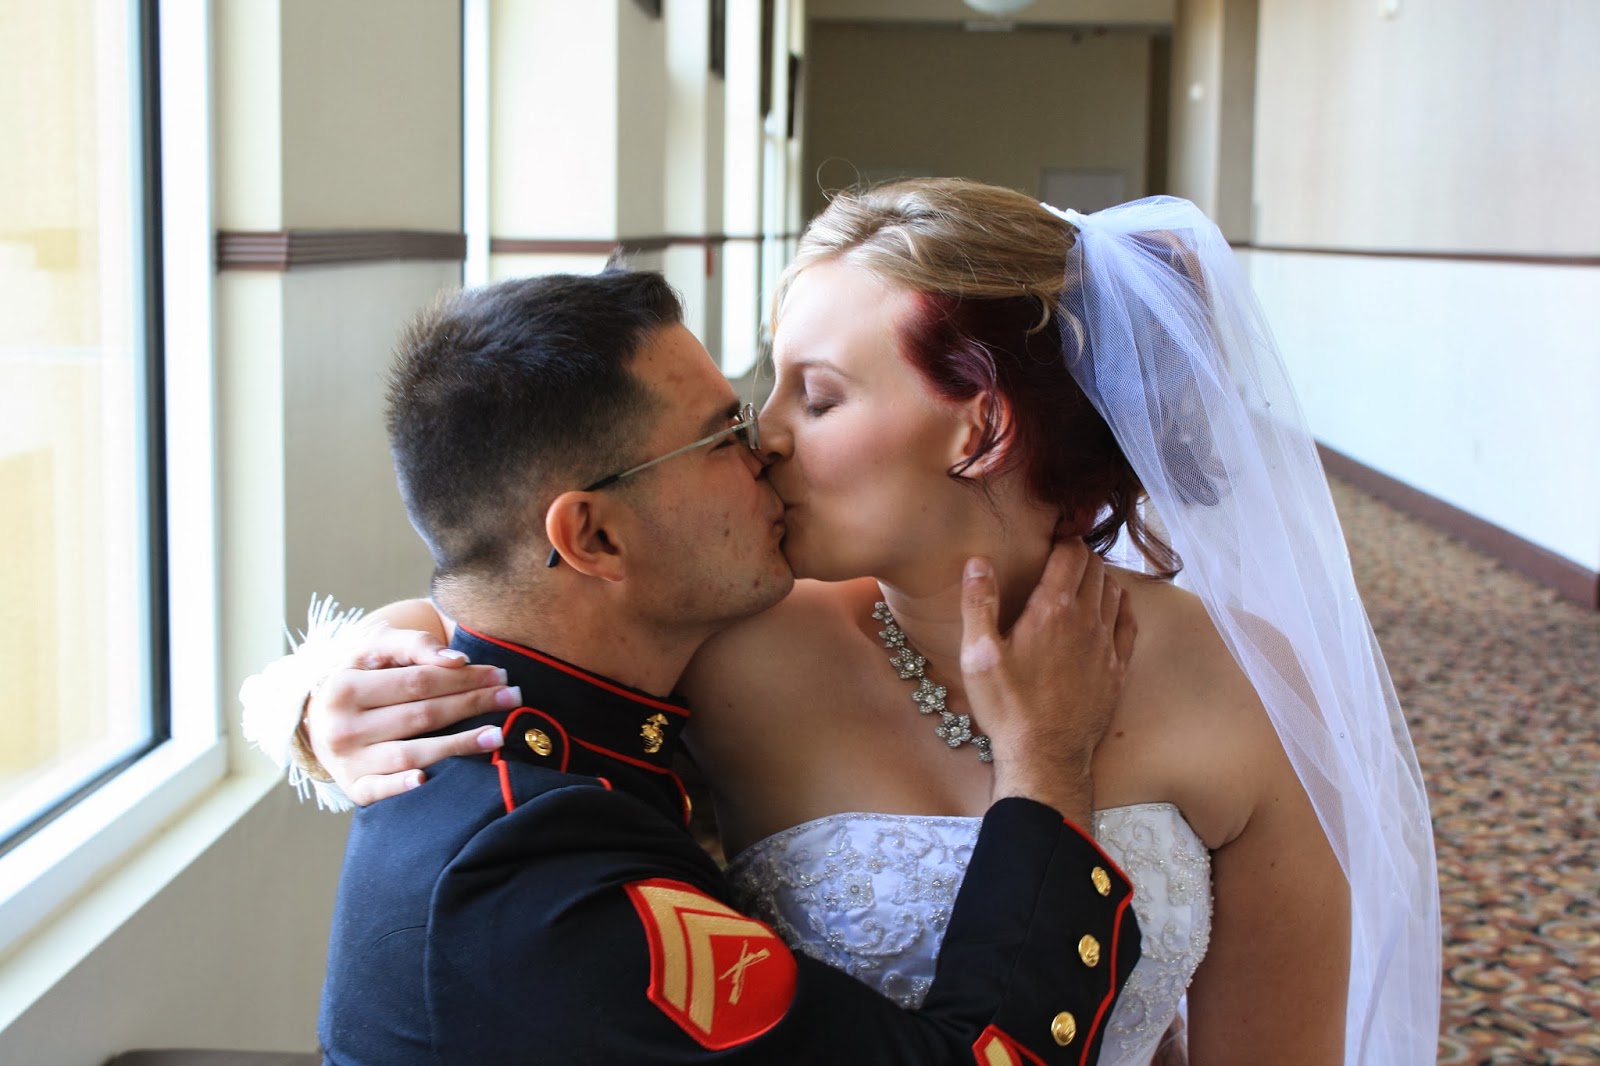
On January 25, 2014 I married the man of my dreams, and my best friend, Russell James Mannex Jr. 

This, by far, was the best day of my life. Not only did I get to have an amazing time with my new husband, but I was able to spend time with my amazing family. I got to see so many side of people I didnt know where there, including myself. It was so beautiful.

My dearest and closest friend Lori made everything come together on such short notice. the fallowing beautiful pictures wouldnt have been possible without her! Not only did she take such amazing pictures, but she decorated and coordinated my entire wedding, and was my florist! I owe her so much for doing all these amazing things for me!


She did such an amazing job, and these are only a fraction of the pictures she mananged to take. She made me feel so amazing in these pictures, she made me feel like a princess!

So now all I have to do is take all 320 photos from the wedding and make 4 scrap-chipboard albums for family members. That isnt to much at all right? I already have some of the supplies. Blank Chipboard Albums and Scrapbook Paper from Michaels. Lots of stickers, laces, pearls, beads, yadda-yadda-yadda! I am so excited to get started.... but I have to have the photos printed and I havent found a place I like yet!


Tuesday, December 31, 2013

So Close To The New Year

So Close To The New Year

Tonight is the night! I am so very excited for the New Year! New things are coming, oh boy are they coming. I have spent the last few days, in between work and planning my Wedding, have been making some hard decisions that will effect my future. But I believe it is the right path, and also a very happy path.

But enough about that. I would now like to share my first project of the New Year. Yes I know I am one day early, but I couldnt wait! I appologize in advance for the poor picture quality, I am having to use my Smartphone.


It started off as a plain paper mask I found digging through my bucket of "un-altered-items". I believe I bought it 2 years back when the Halloween Decorations went on Clearance at my local Super Target? I decided to "deco-podge" it using a sheet of Lost and Found Scrapbook Paper and Luster ModPodge. I then added pink "fancy fiber" yarn around the eye cut outs with Hot Glue, adding the small rhinestones to the corners of the eye holes shortly after. I then Hot Glued the stringed Drop Pearls around the bottom edge, and shortly after the glue dried, I used another very thin layer of Hot Glue to add the yarn to cover the obvious hot glue mess. Last but not least, for me the rhinestones along the eye cut outs just werent enough so added some to the upper corners of the mask, and around the main points of the center crown.

Shortly after doing all that work, I discovered a Pin on Pinterest which, in turn, led me to a tutorial on Youtube. Not only were they beautiful projects but it was a very clear tutorial on how to construct a Dream Catcher.


I was very inspired by one of her Dream Catchers in particular, the one the mask hanging from the bottom. That Project sparked the inspiration to attach my "experimental" project to a second project.

In an attempt to not take from the original tutorial, I will not try to explain the steps I took to make my Dream Catcher. I fallowed her steps exactly so please seek her tutorial if you decide to take on a similiar project. 

I will however tell you were my supplies to create it came from. The ring can be found at Joanns, made by Darice. The White Ribbon was from a cheapy spool from Walmart. And the Shiny Margenta String was from Micheals, found in the Clearance section sometime back.

Then to hide the string along the edges of the ring, I placed the fabric roses around the ring. These flowers were also found in the Clearance Section so sadly I dont recall the company that supplied them.


Thursday, December 26, 2013

New Year, Fresh Start, Fantastic Future.

New Year, Fresh Start, Fantastic Future.

   Hello there!!
My name is Devon Brown, I am 22 years old.
This is this is the start of my new and improved Blog,
and I would like to start out by telling you a little about myself.

~I am currently settled in a small town in California called Apple Valley. But please don't ask if there are apples here, because unless you're going to the grocery store they're non-existent. It is a vast desert waste land full of flat-landers and desert rats.
~I currently own and operate a Pepperidge Farm Distributorship. Yes that is those Famous Goldfish Crackers many kids love so much, and those amazing gourmet Milano Cookies that are usually plastered all over TV.
~I am recently engaged to my amazing Fiancee, a hard working man and protector of his Country. My Future Husband is in the United States Marine Corps and will be deploying sometime in Feb. 2014 to Bahrain.


~I am a girl of many talents, at least I like to call them talents. My first love of art was discovered in my Freshman Year of High School, a drawing class to spark the fire. My second love for art came in the form of a digital camera that I bought with some of the money I recieved for graduating High School. This led to a photography class at my local community college, which then in turn led to meeting a very dear friend named Lori. She helped spark my third love of art, scrapbooking and altered crafting!

I haven't been scrapbooking/altered crafting for very long but it has become my favorite "go-to" alone time when I need to get away from the stresses of my adult life. But all my forms of art help me escape to my fairy-elven lands deep within my mind, and allow me to bring something back from each trip to share with Family and Friends, and now You! But I will warn you, I jump around alot! So please bare with me!

I have made a few goals for myself to stay busy while the Love of my Life is away. Some may be a little far fetched, especially since I dont have many "wise years" under my belt. But it all comes down to doing the best I can each day, in fact, I must Kick Ass every day and prove that I can handle any obsticle thrown in my way!

Starting January, I plan to share my many forms of Art to the World via this Blog, Facebook, Pinterest, and other sites I have yet to decide on, so stay tuned for more information on that one. I have the hopes of becoming a Guest Designer for some Scrapbooking Companies, one of those far fetched goals right there. I also have hopes of meeting many new friends this year, especially ones that will enjoy in my arts with me.

I would like to thank you for noticing my Blog, and taking the time to read this splurge about me. Please stay tuned for the times I will share my many creations, and please dont be scared to share them with the world!